Exploring TuiView plugins and developing your own
Introduction
TuiView has lots of build-in functionality as discussed in previous posts. However, there are bits of functionality we did not add to TuiView but instead made available as a plugin. This was either because the use was very obscure and didn’t seem worth cluttering up TuiView’s codebase, or other dependencies were required and it didn’t make sense to have TuiView package dependent upon this other package.
Plugins are a general mechanism that you can use to embed your own functionality on top of TuiView. This posts talks about the existing plugins in the tuiview-plugins repository before briefly covering how to develop a plugin yourself.
Installing tuiview-plugins
The recommended way of installing tuiview-plugins is from the git repo:
pip install git+https://github.com/ubarsc/tuiview-plugins.git
Do this into an environment where you already have TuiView installed. To explore
the plugins available, run tuiviewpluginmgr on the command line. You will be
presented with a Qt based GUI that lists the plugins available with a short
description:

Clicking the “Enabled” check box against one or more plugins will show you how
to set the TUIVIEW_PLUGINS_PATH environment variable to have it load for different types of shell.
Note that this environment variable must be set before TuiView is run to get
the plugin to load.
If you want certain plugin(s) always loaded you can make them Enabled and click
“Save and Exit”. These plugin(s) will be always Enabled when you start tuiviewpluginmgr.
To ease loading of these plugins each time you run TuiView, you can run:
eval `tuiviewpluginmgr -s`
In your ~/.bashrc (for Bash) or your ~/.tcshrc (for tcsh). This will always set
the TUIVIEW_PLUGINS_PATH for the enabled plugins when you login.
Alternatively, you can copy the relevant plugin files to one of the locations mentioned in the TuiView Wiki.
When you start TuiView with TUIVIEW_PLUGINS_PATH set, a message will be printed to the
terminal that lists the plugins that have been loaded. Normally, plugins make a change
to TuiView’s user interface but this depends on how the plugin has been written. Let’s
look at the various plugins that are part of the tuiview-plugins repository.
GPS Marker
This plugin adds a “GPS” menu to the menu bar of each TuiView window. This plugin assumes that gpsd has been installed on your system and has been started and that a suitable GPS receiver has been connected to your computer. The menu has 2 options: “Start Logging” and “Stop Logging”. When you start logging the current GPS location will be plotted on all TuiView windows:
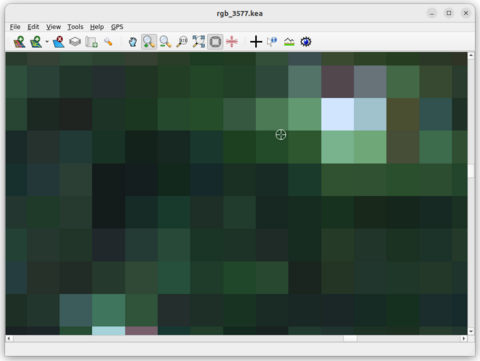
When the GPS location is updated, then the “bullseye” cursor will move to the new location on all windows. When you select “Stop Logging” the cursor will be hidden.
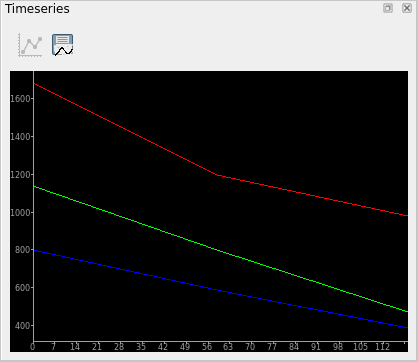
Timeseries Plot
This plugin adds a “Timeseries Plot” menu to the menu bar of each TuiView window. The menu has 3 options:
doing a timeseries on a point, a polygon and how to summarise points in a polygon.
The intention is that you load a stack of images up within one viewer. Ideally, each
file will be annotated with the LCR_Date metadata item which specifies the date
of the image in YYYYMMDD format as shown below with gdal_edit:
gdal_edit -mo LCR_Date=20250501 image.kea
If this is not set, then each image will be assumed to be one day apart, which isn’t
normally what you are after. When LCR_Date is set, then the number of Julian days
between each image is displayed. To plot a single
point through the timeseries, select “Do a timeseries analysis on a point” from the
“Timeseries Plot” menu. Then click within the rasters and a timeseries plot will be shown:
To do a summary of polyon values through a timeseries, select “Do a timeseries analysis on a polygon”. How the values within each polygon is summarised for the plot is controlled by the “Polygon Summary Method” menu option. Note that like other TuiView tools, left click to create a new vertex of the polygon and right click to close.
Note that like the profile tool, only the displayed bands are shown.
Collect Shapefile
This plugin adds a “Collect” menu to the menu bar. This plugin needs an image loaded before it will work. The first 3 options on the menu (“Create a new Polygon Shapefile”,”Create a new Line Shapefile” and “Create a new Point Shapefile”) all prompt you for the name of the output shapefile to create. Once you have completed one of these options, you can select “Collect Feature” from the menu. For polygon and line files, left click creates a new vertex and right click finishes the feature. For points you just need to click within the raster. When you have finished drawing features, click the “Close Shapefile” option. The shapefile that has been created will be in the same projection as the loaded raster file. Each feature will have a unique FID.
Scalebar and North Arrow
This plugin adds a “Scale Bar” menu to the menu bar. This plugin can add a scale bar, a north arrow, a citation and/or a logo to the display in the viewer. The intention is that any time you save the current display, then these extra things will also be saved to the .png making the result something that could be put into a report or some other document where this extra information would be useful. To enable a scale bar, select the “Show Scale Bar” menu option. To enable a north arrow, select the “Show North Arrow” menu option. To add citation text, select “Set citation text” and you will be prompted for the text to display. To add a logo, select “Set logo” and you will be prompted for an image file to display as the logo. Here is an example of a scale bar, north arrow, citation and logo all displayed within a TuiView window:
QML Reader
For compatibility with QGIS, the QML Reader plugin allows .qml files to be read and the colour information applied to a single band image via the stretch window. This plugin just adds one button to the stretch window:
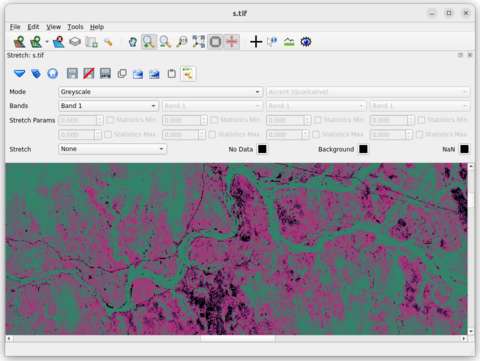
Note how there is an extra button (![]() ) on the right hand side of the toolbar
to allow loading of the QML file. When you press this button, you will
be prompted for the QML file to apply. Once you have done this the .qml
file will be applied to the the loaded image and the stretch window will
be closed. Note that the image must be single band and that the Stretch
type will automatically be set to None before the QML is applied to match
QGIS. Note also that altering the stretch parameters and applying the
change will lose the colouring information in the window - you have to set the
colours via the QML button.
) on the right hand side of the toolbar
to allow loading of the QML file. When you press this button, you will
be prompted for the QML file to apply. Once you have done this the .qml
file will be applied to the the loaded image and the stretch window will
be closed. Note that the image must be single band and that the Stretch
type will automatically be set to None before the QML is applied to match
QGIS. Note also that altering the stretch parameters and applying the
change will lose the colouring information in the window - you have to set the
colours via the QML button.
Location Broadcast
This plugin does not make any change to the user interface. It logs to a
file each time that the TuiView windows are zoomed or panned. This file
is saved under the /tmp directory, or whatever your TMP environment
variable is set to. The filename will be locationbcast_XXXX where XXXX
is your user ID (or username under Windows). Each time TuiView moves
or pans, this file is rewritten with a timestamp and the new bounds.
This idea is that other software can monitor this file and update as
needed when the location moves.
Recode
This plugin creates a “Recode” menu on the menu bar. This plugin is for manually editing rasters by drawing polygons. Instead of updating the raster directly, it saves each polygon and recode rules for later editing or creation of new image with these edits applied.
To recode an image, load a thematic image into TuiView. Click “Start Recoding Top Layer” under the “Recode” menu. To recode values in an area, click “Recode Polygon” and select a polygon in the usual TuiView way (left click for new vertex, right click closes). Then you will be presented with a table of recodes to be made:
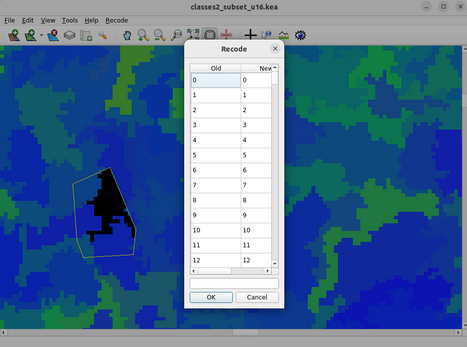
The left column shows the value in the image, the right column (which can be
edited by double clcking) shows the value you wish to change it to. Many recodes
can happen in one polygon in this way. There is space for a comment that applies
to this polygon below the table. When you click OK then the recode will be applied
to the current image so you can see the new values. However the original raster
will not be updated. You can visually see the outlines of your recode polygons
by clicking “Show Oulines of Polygons”. To change the recode rules for a polygon,
select “Edit Recodes of a Polygon” in the “Recode” menu. You can then click a
point within a polygon and the recode table will again be shown and you can make
changes as appropriate. When you want the updates saved, click “Save recodes to file”
in the “Recode” menu. This will save a JSON file with all the polygons and recodes
the same as the raster file but with .recode appended onto the file name. So, for
example, if you were editing /tmp/a.kea then your edits will be saved as /tmp/a.kea.recode.
If you were to start a new TuiView and start recoding the same image again you will be asked whether you want to load the existing recodes and add to them, or start a new set of recodes.
To create a new raster file from the original raster file and edits stored in a .recode
file, use the newfile_from_recode entry point that was created when you
installed tuiview-plugins.
Creating your own plugins
It is relatively easy to create your own plugins. As described in the
plugin wiki page, you need
to create a Python file with four functions plus an event handler if
your plugin needs to respond to events. Because TuiView looks at all Python
files in the directory(s) set in TUIVIEW_PLUGINS_PATH, we recommend starting
by creating a directory with just your plugin file in it:
mkdir test
export TUIVIEW_PLUGINS_PATH=`pwd`/test
# edit test/plugin.py
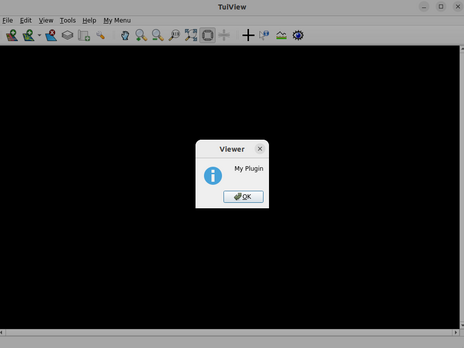
Below is a very simple plugin that adds a menu to the menu bar and displays a message box when the user selects “My plugin Action”:
The source code is shown below:
from PySide6.QtCore import QObject
from PySide6.QtGui import QAction
from PySide6.QtWidgets import QMessageBox
from tuiview import pluginmanager

def name():
    return 'Test'

def author():
    return 'Sam Gillingham'

def description():
    return 'Tests that plugin works'

class MyEventHandler(QObject):
    def __init__(self, viewer):
        QObject.__init__(self)
        self.viewer = viewer

    # this function gets called when action triggered
    def myEvent(self):
        QMessageBox.information(self.viewer, "Viewer", "My Plugin")

def action(actioncode, viewer):
    # check for the code we are interested in
    if actioncode == pluginmanager.PLUGIN_ACTION_NEWVIEWER:

        # create a handler class
        handler = MyEventHandler(viewer)
        # create an action class
        myaction = QAction(viewer, triggered=handler.myEvent)
        myaction.setText("My plugin Action")

        # create a new menu and install the action
        mymenu = viewer.menuBar().addMenu("&My Menu")
        mymenu.addAction(myaction)

        # make sure the object isn't garbage collected
        viewer.plugins.append(handler)
Obviously, some experience with Qt is required for building plugins. You need to
create a QObject derived class to connect to signals and handle them. This class
must be added to the plugins list of the window it belongs to so it does not
get garbage collected by Python. You also need to be aware how TuiView works
behind the scenes. The existing plugins are useful for this and there is some
developer documentation available
but the TuiView source code is the best reference.
Conclusion
The existing plugins in the tuiview-plugins repo provide some useful extensions to TuiView functionality. There is plenty of scope for writing specific TuiView plugins to address specific functionality that may just be required for a particular workflow or company.